Building a Free CTF Infrastructure
Building a CTF infrastructure
Building A Free CTF Infrastructure
Skills developed
This was a fruitful experience and hopefully it’ll be for you too. You will do some:
- Networking:
- Setting up the network of the machines.
- Manage DNS settings for your domain: A, NS, MX, whatever records you want to play with.
- Setup Cloudflare protections.
- Basic and fundemantal Docker “skills”. (Can’t really say you’ll be the most skilled person, but it surely is something)
A word of Caution
Before I start anything, It is important to note that all of the things I’ll discuss below aren’t the only way to get things done. As infrastrucutre depends highly only the demand, the guide is all about passing the information and knowledge others passed to me. As a recognition to Zyyz🔱 from FL1TZ and Jio from Securinets INSAT for fixing the shit and helping me in my first CTF hosting experience. That being said, I hope to see you finding better ways and optimize/enhance whatever is down below.
Overview
The tools and assets we’ll deploy are all included in the Github Student Pack. If you have an alternative or a home lab, you do you.
We’ll deploy Ubuntu servers from Microsoft Azure, register a domain name from Name.com or Namecheap depending on the TLD we want and protect the connection with Cloudflare Free Plan as it is more than enough for our need.
Here is a small overview of what it can look like:
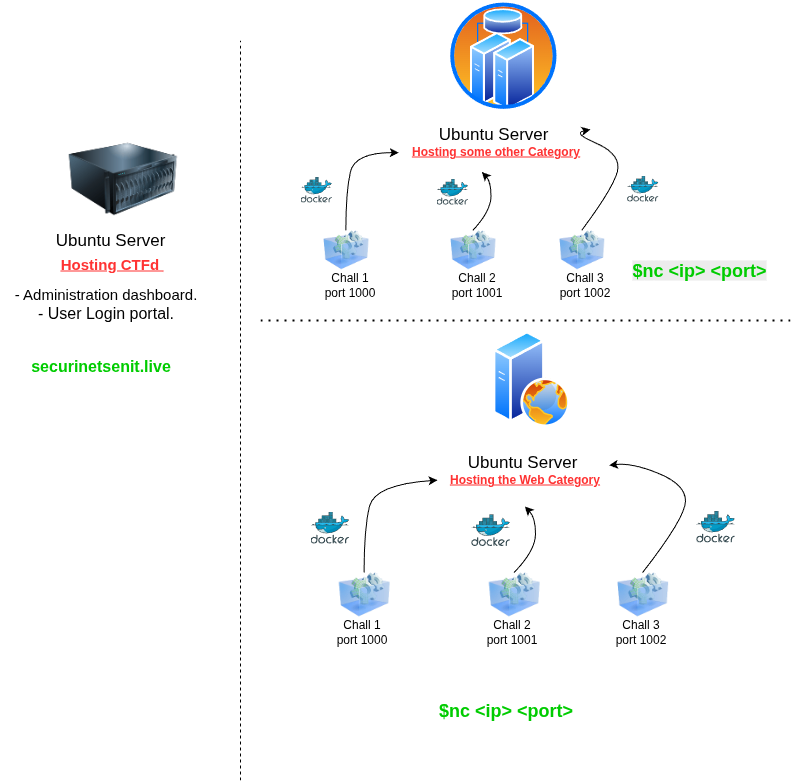
So as seen above:
A VM for the CTfd web interface containing the administration portal and user flag submission. Our DNS must resolve to this IP.
A seperate VM for the Web tasks.
Another seperate VM for other categories.
Of course, you can seperate categories depedning on your needs, If for exmaple you have a large number of forensics/malware analysis tasks you can put them in another seperate machine.
Setting up the instances
CTFd Server
We’ll start off with the CTFd web interface.
Before discussing the resource allocation, te resource group is really important. It give us the ability to manage all of the VMs from a single resource group form a single portal.
But, this also connects all of the machines in that resource group to the same private network. So, this is against what we aim at, which is seperating the VMs of each category.
Connecting the machines together opens up the possibility of Pivoting and Lateral movement by the one targetting our infrastructure.
Consider this when doing a home lab or authoring a challenge where you need some pivoting, tunneling and shit.
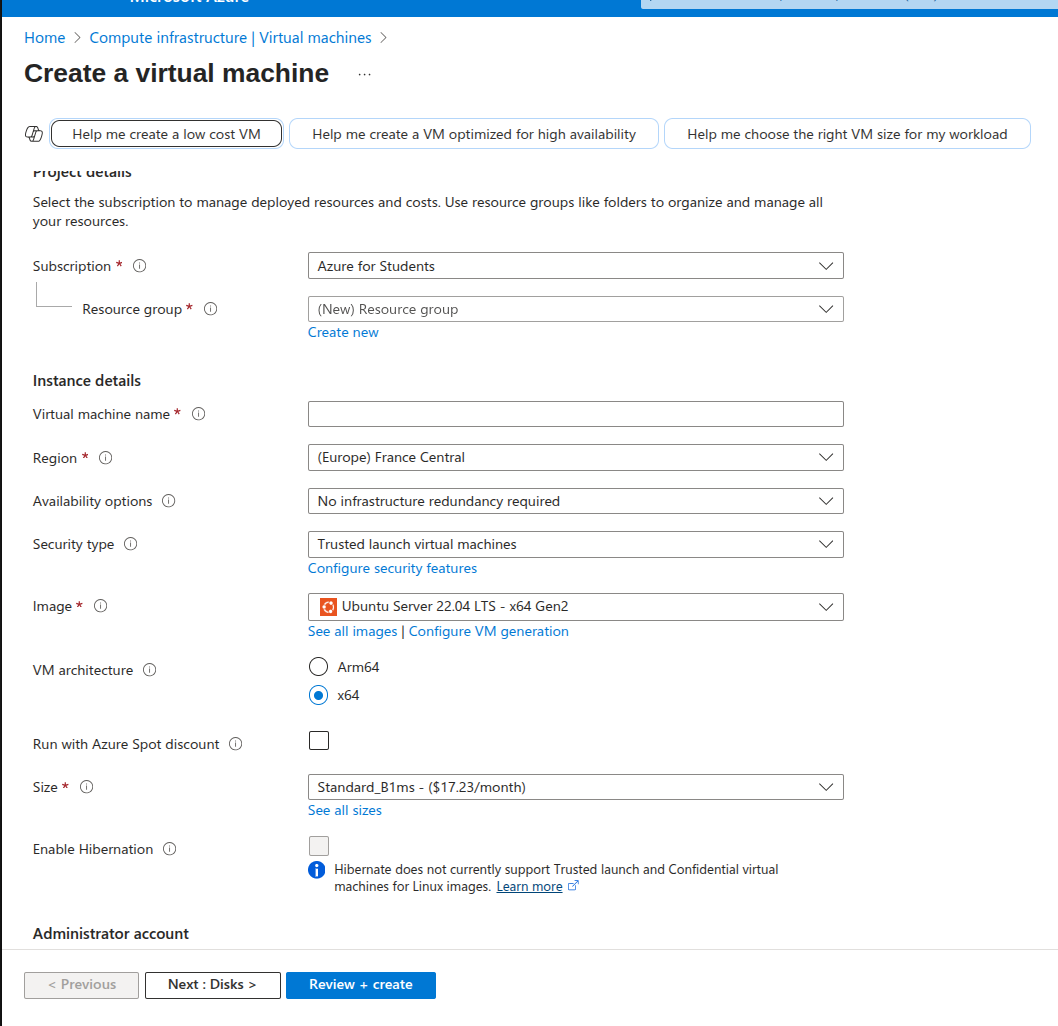
So, depending on your needs, choose the resources for you VM. As for connectivity, You can choose which way you want to access your asset: key or passsword. For reference, for the Friendly CTF we hosted: Cat The Flag By Securinets ENIT, we deployed a 2 cpu, 4GB Ram Ubuntu machine which was more than enough for more than 100 teams of 4.
Be sure to open SSH, HTTP and HTTPS so we can access the web portal. You can setup more firewall rules in the Network Settings section of the VM.
Now, after the deployment is complete:
1
2
3
4
5
6
7
8
# If youre using a password:

ssh user@ip

# If youre using a Key:

chmod 600 key_file
ssh user@ip -i key_file
Update and upgrade you machine:
1
sudo apt update && sudo apt full-upgrade -y
Now the machine is up.
And you should note that you can’t ping it as it is ruled out by default in Azure. So when testing for connectivity, find another way.
Now we need to install CTFd, which is as simple as cloning the repo and installing the requirements, which comes out-of-the-box.
1
git clone https://github.com/CTFd/CTFd
Virtual Environment - requirements installation
As specified in the documentation, we need to install the requirements found requirements.txt using pip.
We need to install pip. Many methods can be found here. I installed it with apt using:
1
2
sudo apt install python3-pip
In the Github repo, we’re asked to run the
pip installcommand directly. This is not a good practice, because in production, if we have conflicting dependencies, this will break something, surely. It is better to use virtual environment.
For this we’ll need python’s module venv
1
sudo apt install python3.10-venv
We’re good to go:
1
2
3
4
5
6
# If youre not in the CTFd directory we've just cloned
cd CTFd/

python3 -m venv ctfd-venv
source ctfd/bin/activate
pip install -r requirement.txt
Docker Engine
Once the requirements are installed, we need docker engine in order to get the CTFd platform up and running.
This can be done by running the commands provided here
1
2
3
4
5
6
7
8
9
10
11
12
13
14
15
16
17
18
for pkg in docker.io docker-doc docker-compose docker-compose-v2 podman-docker containerd runc; do sudo apt-get remove $pkg; done
# Add Docker's official GPG key:
sudo apt-get update
sudo apt-get install ca-certificates curl
sudo install -m 0755 -d /etc/apt/keyrings
sudo curl -fsSL https://download.docker.com/linux/ubuntu/gpg -o /etc/apt/keyrings/docker.asc
sudo chmod a+r /etc/apt/keyrings/docker.asc

# Add the repository to Apt sources:
echo \
  "deb [arch=$(dpkg --print-architecture) signed-by=/etc/apt/keyrings/docker.asc] https://download.docker.com/linux/ubuntu \
  $(. /etc/os-release && echo "${UBUNTU_CODENAME:-$VERSION_CODENAME}") stable" | \
  sudo tee /etc/apt/sources.list.d/docker.list > /dev/null
sudo apt-get update

sudo apt-get install docker-ce docker-ce-cli containerd.io docker-buildx-plugin docker-compose-plugin

sudo docker run hello-world
To avoid copying the commands one by one, I’d like to put them all in a .sh file and simply run:
1
bash docker_install.sh
Once the installtion is complete, we should see a message from the hello-world image.
Post Docker Installtion
This is our first mistake, we shouldn’t be running any container using
sudoas this is a not a good practice and poses a security risk.
For this we’ll create a new group called docker that can run the docker engine without root access, and add our current user to that group.
1
2
3
sudo groupadd docker
sudo usermod -aG docker $USER
newgrp docker
We can enable docker(make it run at startup)
1
2
sudo systemctl enable docker.service
sudo systemctl enable containerd.service
Deploying the web interface
Now, that docker is installed, simply run
1
2
3
4
5
docker compose up

# or if you want to run it as a daemon and get back to the terminal:
docker compose up -d
We used the docker compose utility because we a docker-compose.yml file. As specified in the documentaiton, using the Dockerfile, we could’ve done the same with the following command:
1
docker run -p 8000:8000 -it ctfd/ctfd
Configuration
Now navigating to your public IP address, you’ll find your web portal from which you setup the admin account, your CTF rules..etc
At this point, we have the running CTFd platform. But only on HTTP, with no domain name. What’s next?
- Setting up our DNS settings.
- Cloudlflare.
- Launch the challenge askers for the players to connect with
nc. I’ll be adding that in the next few days. 3alakhir.
In the meantime, you should listen to this:
https://www.youtube.com/watch?v=7m1UpqIkK3c&list=RDMM7m1UpqIkK3c&start_radio=1
Thank me later.